Battery switch on travel trailer function is crucial for managing your RV’s power. Understanding how this simple yet vital component works is key to preventing dead batteries and ensuring a smooth camping experience. This guide breaks down the different types of switches, their wiring, operation, and troubleshooting, helping you become a confident RV power manager.
We’ll cover everything from choosing the right battery switch for your setup and battery type (flooded lead-acid, AGM, or lithium) to performing routine maintenance and understanding safety precautions. We’ll also explore power management strategies to maximize your battery life and avoid common problems. Get ready to master your travel trailer’s power system!
Understanding Battery Switch Functionality in Travel Trailers
Keeping your travel trailer’s batteries charged and ready to power your appliances is crucial for a comfortable camping experience. A battery switch is the key component that manages the flow of power between your trailer’s batteries and various electrical systems. Understanding how it works is essential for preventing electrical issues and maximizing your battery life.
Types of Battery Switches, Battery switch on travel trailer function
Travel trailers typically use one of two main types of battery switches: a simple on/off switch or a more sophisticated selector switch. The simple on/off switch is exactly what it sounds like – it either connects your batteries to the trailer’s electrical system or disconnects them completely. Selector switches offer more control, allowing you to choose between different battery banks (e.g., house batteries and chassis batteries) or to connect both to the trailer system simultaneously.
Some advanced selector switches even include features like an auxiliary input for charging from shore power or a generator.
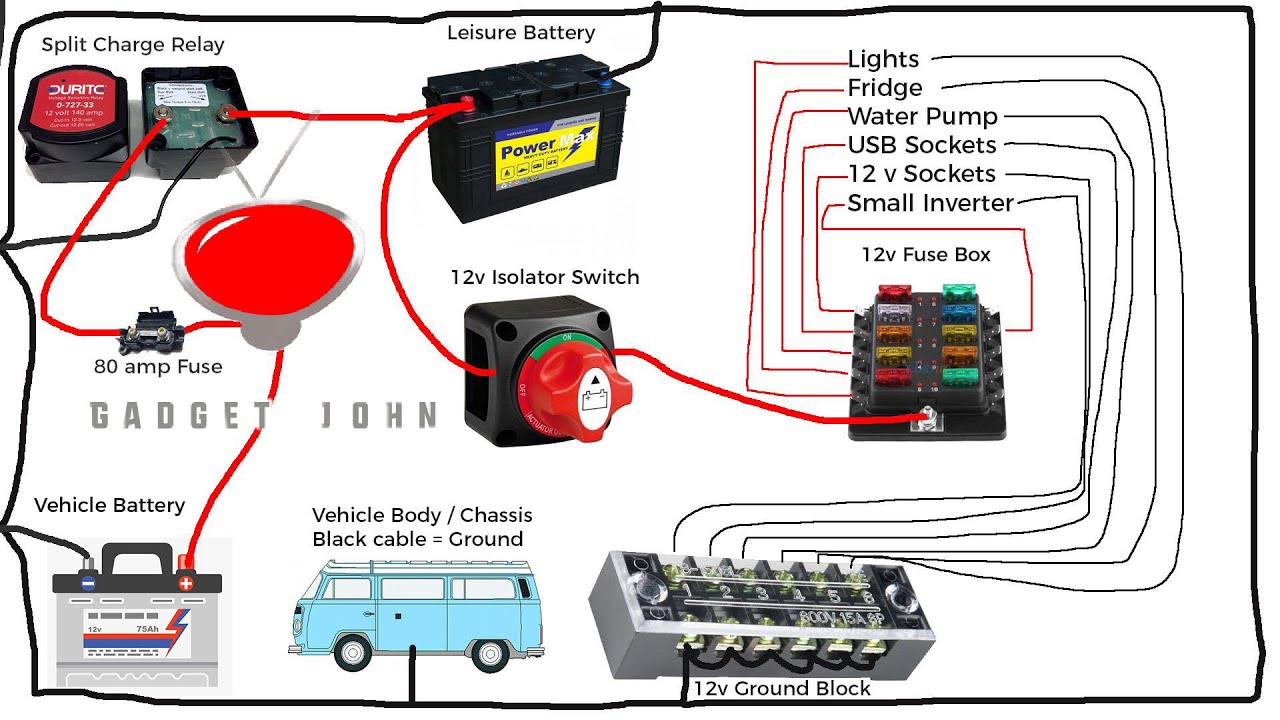
Typical Wiring Diagram of a Battery Switch System
A basic wiring diagram for a simple on/off battery switch would show the positive (+) cable from your battery(ies) connecting to the switch’s input. The switch’s output then connects to the positive bus bar of your trailer’s electrical system. A similar setup exists for the negative (-) cables, although a negative bus bar is less common. A more complex diagram for a selector switch would include multiple input points for different battery banks, and potentially an additional output for charging.
The exact configuration will vary depending on the trailer’s electrical system and the type of switch installed. Imagine a simple diagram: a battery symbol with a positive cable going to the switch, the switch with an output cable to the trailer’s load (appliances), and then ground cables completing the circuit. For a selector switch, you’d add another battery symbol and its associated cabling, allowing selection between or combination of battery sources.
Operating a Battery Switch
Operating a battery switch is generally straightforward. For a simple on/off switch, simply flip the switch to the “on” position to connect the batteries to the trailer’s system. Flip it to the “off” position to disconnect the batteries, preventing accidental drain. For a selector switch, carefully read the switch’s markings to understand each position. Each position will likely indicate which battery bank (or combination) is connected to the trailer’s system.
Always ensure the switch is in the correct position before turning on any appliances or charging the batteries. Remember to turn the switch off when not using the trailer to prevent battery drain.
Advantages and Disadvantages of Different Battery Switch Designs
Simple on/off switches are inexpensive and easy to use, but they offer limited control. They are suitable for trailers with a single battery bank and simple electrical systems. However, they lack the flexibility of selector switches. Selector switches provide greater control and flexibility, allowing you to manage multiple battery banks and optimize battery usage. However, they are more expensive and can be more complex to operate.
The increased complexity also means a slightly higher risk of misoperation. Consider your trailer’s electrical needs and your comfort level with electrical systems when choosing between these two designs.
Troubleshooting Common Battery Switch Issues
Dealing with a faulty battery switch in your travel trailer can be frustrating, but understanding the common problems and troubleshooting steps can get you back on the road quickly. This section will guide you through identifying and resolving issues with your battery switch, ensuring a smooth and safe power supply for your adventures.
Several issues can arise with travel trailer battery switches, often stemming from simple problems or signs of wear and tear. These issues can range from a complete lack of power to inconsistent performance, affecting various appliances and systems in your RV.
Common Battery Switch Problems
Knowing the typical problems associated with battery switches is the first step towards effective troubleshooting. Here are some of the most frequently encountered issues:
- Loose or Corroded Connections: Over time, connections can loosen, leading to poor contact and reduced power flow. Corrosion, often caused by moisture, can further exacerbate this problem.
- Faulty Switch Mechanism: The switch itself might be internally damaged, preventing it from making or breaking the circuit correctly. This can be due to wear, accidental damage, or manufacturing defects.
- Blown Fuse or Circuit Breaker: A blown fuse or tripped circuit breaker in the battery system will prevent power from reaching your trailer’s appliances. This is a common safety mechanism, often triggered by an overload.
- Wiring Problems: Damaged, frayed, or improperly connected wires can disrupt the electrical flow, leading to partial or complete power loss. This can occur anywhere in the wiring from the battery to the switch and beyond.
- Battery Issues: While not directly a battery switch problem, a dead or failing battery will naturally impact the system, even if the switch is functioning perfectly. Testing the battery is crucial.
Troubleshooting Steps for a Malfunctioning Battery Switch
Systematic troubleshooting is key to pinpointing the source of the problem. Follow these steps to diagnose a malfunctioning battery switch:
- Visual Inspection: Begin by carefully examining the switch and its connections. Look for loose wires, corrosion, or any signs of physical damage. Tighten any loose connections.
- Check Fuses and Circuit Breakers: Inspect the fuses and circuit breakers in the battery system. Replace any blown fuses with the correct amperage rating. Reset any tripped circuit breakers.
- Test the Battery: Use a multimeter to check the battery voltage. A reading significantly below 12 volts indicates a weak or dead battery that needs attention.
- Test Continuity: With the switch in the “on” position, use a multimeter to test continuity between the input and output terminals of the switch. A lack of continuity suggests a problem within the switch itself.
- Trace the Wiring: If the switch and battery check out, trace the wiring from the switch to the appliances to identify any breaks, shorts, or loose connections. Look for any signs of damage or wear along the entire length of the wiring.
Troubleshooting Flowchart
A visual flowchart can help streamline the troubleshooting process. The following illustrates a simple approach:
[Imagine a flowchart here. It would start with “Battery Switch Not Working?” Yes would lead to “Inspect Connections/Corrosion?” Yes leads to “Clean/Tighten Connections”, No leads to “Check Fuses/Circuit Breakers?” Yes leads to “Replace/Reset”, No leads to “Test Battery Voltage?” Yes leads to “Charge/Replace Battery”, No leads to “Test Switch Continuity?” Yes leads to “Replace Switch”, No leads to “Inspect Wiring for Damage?” Yes leads to “Repair/Replace Wiring”, No leads to “Consult Professional”.
No from the initial question would lead directly to “Consult Professional”.]
Safety Precautions When Working with Battery Systems
Working with batteries requires careful attention to safety. Always follow these precautions:
- Wear safety glasses: Protect your eyes from potential splashes of battery acid.
- Wear gloves: Prevent skin contact with battery acid, which is corrosive.
- Ensure proper ventilation: Battery gases can be harmful; work in a well-ventilated area.
- Disconnect the battery: Always disconnect the negative (-) terminal first before working on any part of the battery system. Reconnect the positive (+) terminal last.
- Never short circuit the battery: This can cause sparks, heat, and potentially an explosion.
Battery Switch and its Role in Power Management
Your travel trailer’s battery switch is the unsung hero of power management. It’s the central control point for directing power from various sources – your shore power hookup at a campground, your onboard generator, and your house batteries – to your appliances and systems. Understanding how it works is key to enjoying reliable power and preventing costly battery drain.The battery switch acts as a gatekeeper, allowing you to selectively choose which power source feeds your trailer’s electrical system.
This is crucial for preventing accidental discharge of your house batteries when you’re connected to shore power or running the generator. It also helps you manage your battery power more effectively, extending the lifespan of your batteries and avoiding unexpected power outages.
Power Consumption Comparison: Battery vs. Shore Power
The following table compares the power consumption of common appliances when running on battery power versus shore power. Remember that these are estimates and actual consumption can vary depending on the specific appliance and its usage. Shore power offers significantly more capacity, meaning higher-wattage appliances work efficiently without draining your batteries quickly.
| Appliance | Power Consumption (Battery) | Power Consumption (Shore Power) | Notes |
|---|---|---|---|
| LED Interior Lights | Low (approx. 5-10 watts per light) | Low (approx. 5-10 watts per light) | Minimal difference; LED lights are energy efficient. |
| Refrigerator (12V DC) | Medium (approx. 3-5 amps) | Low (approx. 1-2 amps, AC) | Running on AC is far more efficient; 12V DC operation will drain batteries faster. |
| Microwave Oven | N/A (typically requires 120V AC) | High (approx. 1000-1500 watts) | Requires shore power or generator. |
| Air Conditioner | N/A (typically requires 120V AC) | Very High (approx. 1500-2000 watts) | Significant power draw; requires shore power or generator. |
| Water Pump | Medium (approx. 3-5 amps) | Medium (approx. 3-5 amps, if using a 120V AC pump) | Power draw depends on pump type. |
Best Practices for Conserving Battery Power
Efficient battery management is essential for extended off-grid camping. By following these best practices, you can significantly prolong your battery life and avoid unexpected power failures.
Prioritizing power usage is key. Limit the use of high-draw appliances like air conditioners and microwaves while operating solely on battery power. Utilize energy-efficient LED lighting instead of incandescent bulbs. Regularly monitor your battery level using a voltmeter to avoid deep discharges, which can damage your batteries.
- Minimize the use of high-drain appliances (air conditioners, microwaves) while on battery power.
- Use energy-efficient LED lighting.
- Turn off appliances and lights when not in use.
- Regularly check your battery voltage to prevent deep discharges.
- Consider using a solar panel to supplement your battery power.
- Plan your activities to take advantage of shore power or generator access.
Battery Switch and Prevention of Battery Drain
The battery switch plays a critical role in preventing unwanted battery drain. When the switch is in the “off” position, it completely isolates the house batteries from the trailer’s electrical system. This prevents parasitic drain – the slow, constant drain that occurs even when appliances are turned off – from depleting your batteries while you’re not using them or when connected to shore power.
This is especially important for long-term storage, preventing complete battery discharge. When connected to shore power, ensure the switch is in the appropriate position to charge your batteries properly and avoid unnecessary drain.
Battery Switch Installation and Maintenance
Installing a battery switch in your travel trailer is a worthwhile project that improves power management and extends the life of your batteries. Proper installation ensures safe and reliable operation, while regular maintenance prevents costly repairs and downtime. This section details the installation process and provides crucial maintenance tips to keep your battery switch running smoothly for years to come.
Battery Switch Installation Procedure
Installing a battery switch requires some basic electrical knowledge and tools. Improper installation can lead to electrical hazards, so if you’re uncomfortable working with electricity, consult a qualified RV technician. The specific steps may vary slightly depending on your chosen switch and trailer setup, but the general procedure remains consistent.
- Disconnect the Battery: Before starting any work, always disconnect the negative terminal of your trailer’s battery to prevent accidental shocks or short circuits.
- Choose Installation Location: Select a location that’s easily accessible, well-ventilated, and protected from the elements. Consider proximity to the battery for shorter wiring runs.
- Mount the Switch: Securely mount the battery switch using appropriate hardware. Ensure it’s firmly attached and level.
- Wire the Switch: Connect the positive (+) cable from your battery to the input terminal of the switch. Run a separate cable from the output terminal of the switch to your trailer’s power distribution center. Use appropriately sized wiring for the amperage of your system and secure all connections with appropriate connectors.
- Connect the Ground Wire: Connect a ground wire from the switch’s ground terminal to a clean, grounded metal surface on the trailer chassis. Ensure a solid connection.
- Reconnect the Battery: Once all wiring is complete and checked, carefully reconnect the negative battery terminal.
- Test the Switch: Turn the switch on and off to verify proper operation. Check all connections for tightness and proper function.
Maintaining Battery Switch Connections
Regular inspection and maintenance of the battery switch and its connections are vital for preventing corrosion and ensuring reliable performance. Corrosion can lead to poor connections, overheating, and even fire hazards.
- Inspect Connections Regularly: Check all wire connections for tightness and signs of corrosion at least twice a year, or more often if you live in a humid climate.
- Clean Connections: Use a wire brush or sandpaper to clean any corrosion from the terminals and connectors. Apply a dielectric grease to the terminals after cleaning to prevent future corrosion.
- Tighten Loose Connections: If you find any loose connections, tighten them securely with the appropriate wrench.
- Inspect Wiring for Damage: Regularly check the wiring for any signs of damage, such as fraying or cuts. Repair or replace any damaged wiring immediately.
Regular Inspection and Cleaning
A visual inspection of the battery switch itself should also be part of your routine maintenance. This helps to identify any potential problems before they escalate.
- Check for Damage: Examine the switch for any signs of physical damage, such as cracks or broken parts. Replace the switch if any damage is found.
- Look for Loose Parts: Check for any loose screws or other components. Tighten any loose screws or replace any damaged parts.
- Clean the Switch: Use a clean cloth to wipe down the switch to remove any dirt or debris. Avoid using harsh chemicals or abrasive cleaners.
Battery Switch System Maintenance Checklist
This checklist provides a structured approach to routine maintenance, ensuring your battery switch system remains in optimal condition.
- Disconnect the negative battery terminal.
- Visually inspect all wiring for damage, fraying, or loose connections.
- Clean all battery terminals and switch connections with a wire brush and dielectric grease.
- Tighten all connections using the appropriate tools.
- Inspect the switch housing for damage or loose parts.
- Reconnect the negative battery terminal.
- Test the switch to verify proper operation.
- Record the date of inspection.
Different Types of Batteries and Their Compatibility: Battery Switch On Travel Trailer Function
Choosing the right battery for your travel trailer is crucial for reliable power and the longevity of your battery switch. Different battery types have varying characteristics that affect how they interact with your battery switch and the overall performance of your RV’s electrical system. Understanding these differences is key to making an informed decision.Different battery chemistries offer different advantages and disadvantages regarding power output, lifespan, and maintenance requirements.
This impacts the selection of a suitable battery switch and the overall efficiency of your power management system. Using incompatible batteries can lead to premature failure of the switch or even damage to your trailer’s electrical components.
So, you’re gearing up for a road trip? Awesome! First things first: make sure your travel trailer’s power is sorted. Understanding the battery switch on travel trailer function is key to avoiding dead batteries. Once that’s handled, you can focus on the fun stuff, like setting up your killer sound system. Check out this guide on creating an amazing audiophile travel aetup for the ultimate road trip tunes.
Seriously, good music makes all the difference!
Flooded Lead-Acid Batteries
Flooded lead-acid (FLA) batteries are the most traditional and often the least expensive type. They require regular maintenance, including checking and topping off the electrolyte levels. FLA batteries are generally less efficient than AGM or lithium batteries and have a shorter lifespan. They’re also more susceptible to damage from vibration and extreme temperatures. A standard battery switch designed for 12V systems is typically compatible with FLA batteries, provided the amperage rating of the switch is sufficient for the battery’s capacity.
Absorbent Glass Mat (AGM) Batteries
AGM batteries are sealed, maintenance-free batteries that use a fiberglass mat to absorb the electrolyte. This design makes them more resistant to vibration and less prone to spilling. They offer improved performance compared to FLA batteries, with higher cycle life and better discharge characteristics. AGM batteries are compatible with most standard battery switches, but it’s important to ensure the switch is rated for the appropriate amperage.
So, you’re prepping for a road trip? Awesome! First things first: make sure your travel trailer’s power is sorted. Understanding the battery switch on travel trailer function is key to avoiding dead batteries. Once that’s handled, let’s talk tunes! If you’re an audiophile, setting up your mobile sound system is crucial. Check out some tips on creating an amazing audiophile travel aetup to enjoy your favorite music on the go.
Happy travels!
Lithium Iron Phosphate (LiFePO4) Batteries
Lithium batteries, specifically LiFePO4, are becoming increasingly popular in RVs due to their high energy density, long lifespan, and lightweight nature. They offer significantly more cycles than FLA or AGM batteries and are more efficient in terms of power output. However, they are typically more expensive. While many standard battery switches can handle the voltage of lithium batteries, some lithium batteries require specialized battery management systems (BMS) that may not be compatible with all battery switches.
It’s crucial to check the compatibility of your chosen lithium battery and BMS with your intended battery switch.
Impact of Battery Choice on Battery Switch Functionality and Lifespan
The choice of battery directly affects the battery switch’s lifespan and functionality. Higher amperage batteries and those with higher discharge rates put more stress on the switch’s contacts and internal components. Using a switch with insufficient amperage rating for a high-capacity battery can lead to overheating, arcing, and eventual failure. Similarly, using a switch designed for a different battery chemistry (e.g., a switch optimized for FLA with a lithium battery) might not provide adequate protection or may even be dangerous.
Implications of Using Incompatible Batteries
Using incompatible batteries with a battery switch can result in several issues. This can range from simply not being able to switch power effectively to causing damage to the switch itself, potentially leading to fires or other safety hazards. For example, using a lithium battery with a switch not designed for the higher voltage and current spikes associated with lithium can cause the switch to malfunction or fail catastrophically.
Guide for Selecting the Appropriate Battery Switch
To select the right battery switch, consider these factors:
| Factor | Considerations |
|---|---|
| Battery Type | FLA, AGM, or Lithium. Lithium batteries may require specific BMS compatibility. |
| Battery Bank Voltage | 12V, 24V, or 48V. The switch must match the voltage of your battery bank. |
| Battery Bank Amperage | The switch must have an amperage rating equal to or greater than the maximum current draw of your battery bank. |
| Number of Batteries | The switch should be capable of handling the number of batteries in your bank. |
| Switch Type | Consider features like remote switching, multiple banks, and circuit protection. |
Always consult the manufacturer’s specifications for both the battery and the battery switch to ensure compatibility and safe operation.
Safety Considerations Related to Battery Switches
Working with batteries and electrical systems in a travel trailer requires careful attention to safety. Improper handling can lead to serious injury, damage to your equipment, or even fire. Understanding the potential risks and following established safety guidelines is crucial for a safe and enjoyable RV experience.Battery switches, while convenient, introduce additional points of potential failure and hazard if not correctly installed and used.
The high amperage involved in battery systems demands a respectful and cautious approach.
Risks Associated with Improper Use or Installation
Improper installation of a battery switch can result in loose connections, sparking, and overheating. These conditions can lead to fires, especially if the switch is improperly sized for the amperage of the battery bank. Using the wrong type of switch for your system can also lead to premature failure and potential hazards. Incorrect wiring can create short circuits, potentially damaging equipment or causing a fire.
Furthermore, a poorly installed or maintained switch could lead to corrosion, weakening the connection and increasing the risk of fire. For example, a switch installed in a location exposed to moisture could corrode quickly, leading to a dangerous situation.
Safety Guidelines for Handling Battery Terminals and Connections
Always wear appropriate safety glasses and gloves when working with battery terminals and connections. Battery acid is corrosive and can cause serious burns to skin and eyes. Before disconnecting any terminals, ensure the main power switch to the battery is OFF. This prevents accidental short circuits and protects you from electric shock. When connecting or disconnecting terminals, make sure the connections are clean and tight to avoid arcing and sparking.
Use the correct size wrench or terminal cleaner for the task to avoid damaging the terminals. Never wear loose clothing or jewelry while working near batteries, as these can become entangled or conduct electricity.
Importance of Proper Grounding and Bonding in Battery Systems
Proper grounding and bonding are essential for safety and the proper functioning of your electrical system. Grounding provides a path for fault currents to safely flow to the earth, preventing shocks and protecting your equipment. Bonding connects various metal components of your RV together, ensuring that they are all at the same electrical potential, preventing voltage differences that could cause sparks or corrosion.
Improper grounding can result in electrical shocks, while inadequate bonding can lead to corrosion and potential fire hazards. For example, if your chassis isn’t properly bonded to your battery negative terminal, a fault in the wiring could lead to a dangerous voltage difference between the chassis and the ground.
Procedures for Electrical Shock or Short Circuit
In the event of an electrical shock, immediately disconnect yourself from the source of electricity. If possible, turn off the battery switch. Seek medical attention if necessary. For a short circuit, immediately disconnect the battery’s negative terminal to cut off power. Inspect the wiring and switch for any signs of damage or overheating.
Never attempt to repair electrical systems while they are energized. If you’re unsure how to proceed, consult a qualified RV technician. A short circuit can generate significant heat and can potentially start a fire, so immediate action is crucial. Having a fire extinguisher readily available is a good safety precaution.
Mastering your travel trailer’s battery switch isn’t just about avoiding a dead battery; it’s about maximizing your enjoyment of the RV lifestyle. By understanding the different types of switches, their functionality, and the importance of regular maintenance, you can ensure reliable power and avoid costly repairs. So, take the time to learn about your system – your peace of mind (and your battery) will thank you for it!
FAQ Compilation
What happens if I accidentally switch off the battery while using appliances?
Turning off the battery switch while appliances are running will immediately cut power, potentially causing damage to some electronics. Always turn off appliances before switching the battery off.
How often should I check my battery switch connections?
Inspect your battery switch connections at least once a year, or more often if you notice any issues. Look for corrosion, loose connections, or any signs of damage.
Can I use any type of battery with any battery switch?
No. Different battery types (flooded, AGM, lithium) have different voltage and charging characteristics. Using an incompatible battery can damage the switch or the battery itself. Always check the switch’s specifications.
My battery switch is stuck. What should I do?
Try lubricating the switch mechanism with a suitable lubricant. If it remains stuck, consult a professional RV technician to avoid further damage.
